Sonarqube 설치 + PR decoration 하기
이번 포스팅에서는 docker로 sonarqube를 설치하고 PR decoration까지 하는법을 알아보겠습니다.
최종적으로 아래 사진과 같이 PR에 sonarqube가 리포트를 달아줍니다.

스펙
1. Ubuntu 18.04 LTS
2. Docker version 20.10.17
3. Sonarqube version 9.9.1-community
(포스팅 시점에서 10.x까지 나왔는데, 10 버전부터는 PR decoration을 플러그인으로 적용할 수 없습니다. 아직 10 버전을 지원하는 플러그인이 나오지 않았어요. PR decoration을 위해서 9.9.1버전을 다운해줍시다.)
Sonarqube 설치
docker는 설치되었다고 가정하고 넘어가겠습니다.
저는 sonarqube를 docker를 이용해 설치했습니다.
공식문서에 따르면.. docker를 이용해 설치하는걸 추천하지는 않는데, 따로 DB랑 연결을 해줘야하기 때문인거 같습니다.
sonarqube는 DB를 연결하지않으면, 내부의 h2데이터베이스를 사용하는데, 이러면 나중에 데이터가 날라갈 수 있으니 꼭 DB를 연결해줍시다.
DB와 같이 연결하기위해서, docker-compose를 이용해 설치해줍시다.
다음 링크는 sonarqube 공식레포에서 제공하는 docker-compose.yml 예시입니다.
아래 링크를 통해 docker-compose.yml을 사용하실거면 꼭! Image를 다운그레이드 해줍시다.
GitHub - SonarSource/docker-sonarqube: SonarQube in Docker
:whale: SonarQube in Docker. Contribute to SonarSource/docker-sonarqube development by creating an account on GitHub.
github.com
아래 파일은 제가 사용하고있는 docker-compose구성입니다. (image버전하고 ports만 변경했네요)
version: "3"
services:
  sonarqube:
    image: sonarqube:9.9.1-community
    hostname: sonarqube
    container_name: sonarqube
    depends_on:
      - db
    environment:
      SONAR_JDBC_URL: jdbc:postgresql://db:5432/sonar
      SONAR_JDBC_USERNAME: sonar
      SONAR_JDBC_PASSWORD: sonar
    volumes:
      - sonarqube_data:/opt/sonarqube/data
      - sonarqube_extensions:/opt/sonarqube/extensions
      - sonarqube_logs:/opt/sonarqube/logs
    ports:
      - "4093:9000"
  db:
    image: postgres:13
    hostname: postgresql
    container_name: postgresql
    environment:
      POSTGRES_USER: sonar
      POSTGRES_PASSWORD: sonar
      POSTGRES_DB: sonar
    volumes:
      - postgresql:/var/lib/postgresql
      - postgresql_data:/var/lib/postgresql/data

volumes:
  sonarqube_data:
  sonarqube_extensions:
  sonarqube_logs:
  postgresql:
  postgresql_data:
주의! 바로 실행시키면 안됩니다.
sonarqube가 내부적으로 elasticsearch를 사용하고있는데, elasticsearch가 요구하는 vm memory 용량을 늘려줘야 합니다
/etc/sysctl.conf 파일을 열고, 아래 내용과 같이 추가하거나 수정해줍시다.
vm.max_map_count=262144바로 적용이 안될수도있으니, 다음 명령어를 통해 바로 적용도 해줍시다.
sysctl -w vm.max_map_count=262144모든 구성을 완료했다면, 다음 명령어를 입력해 서버를 실행시켜봅시다.
docker-compose up정상적으로 실행되었다면, 브라우저로 접근할 수 있고.. 처음 비밀번호는
id : admin
password : admin
입니다.
Sonarqube와 깃헙 프로젝트 연결
sonarqube와 깃허브 프로젝트를 연결하기 위해서, github app을 만들어야 합니다.
github app 안만들어도 연결이 가능은 한데.. 나중에 PR decoration 사용할때 필요해요. 조금 귀찮더라도.. 깃허브 프로젝트 연결을 위해 github app을 만들어 봅시다.
아래 페이지는 github app을 만드는 sonarqube 공식문서 입니다.
별로 어렵지 않으니 문서에 따라 만들어 봅시다.
https://docs.sonarqube.org/9.9/devops-platform-integration/github-integration/
GitHub integration
docs.sonarqube.org
github app을 만들었다면, sonarqube로 돌아와서, 다음 링크로 이동합니다.
Administration > DevOps Platform Integrations > Github > CreateConfiguration
그럼, 아래 사진과 같이 설정창이 뜹니다.
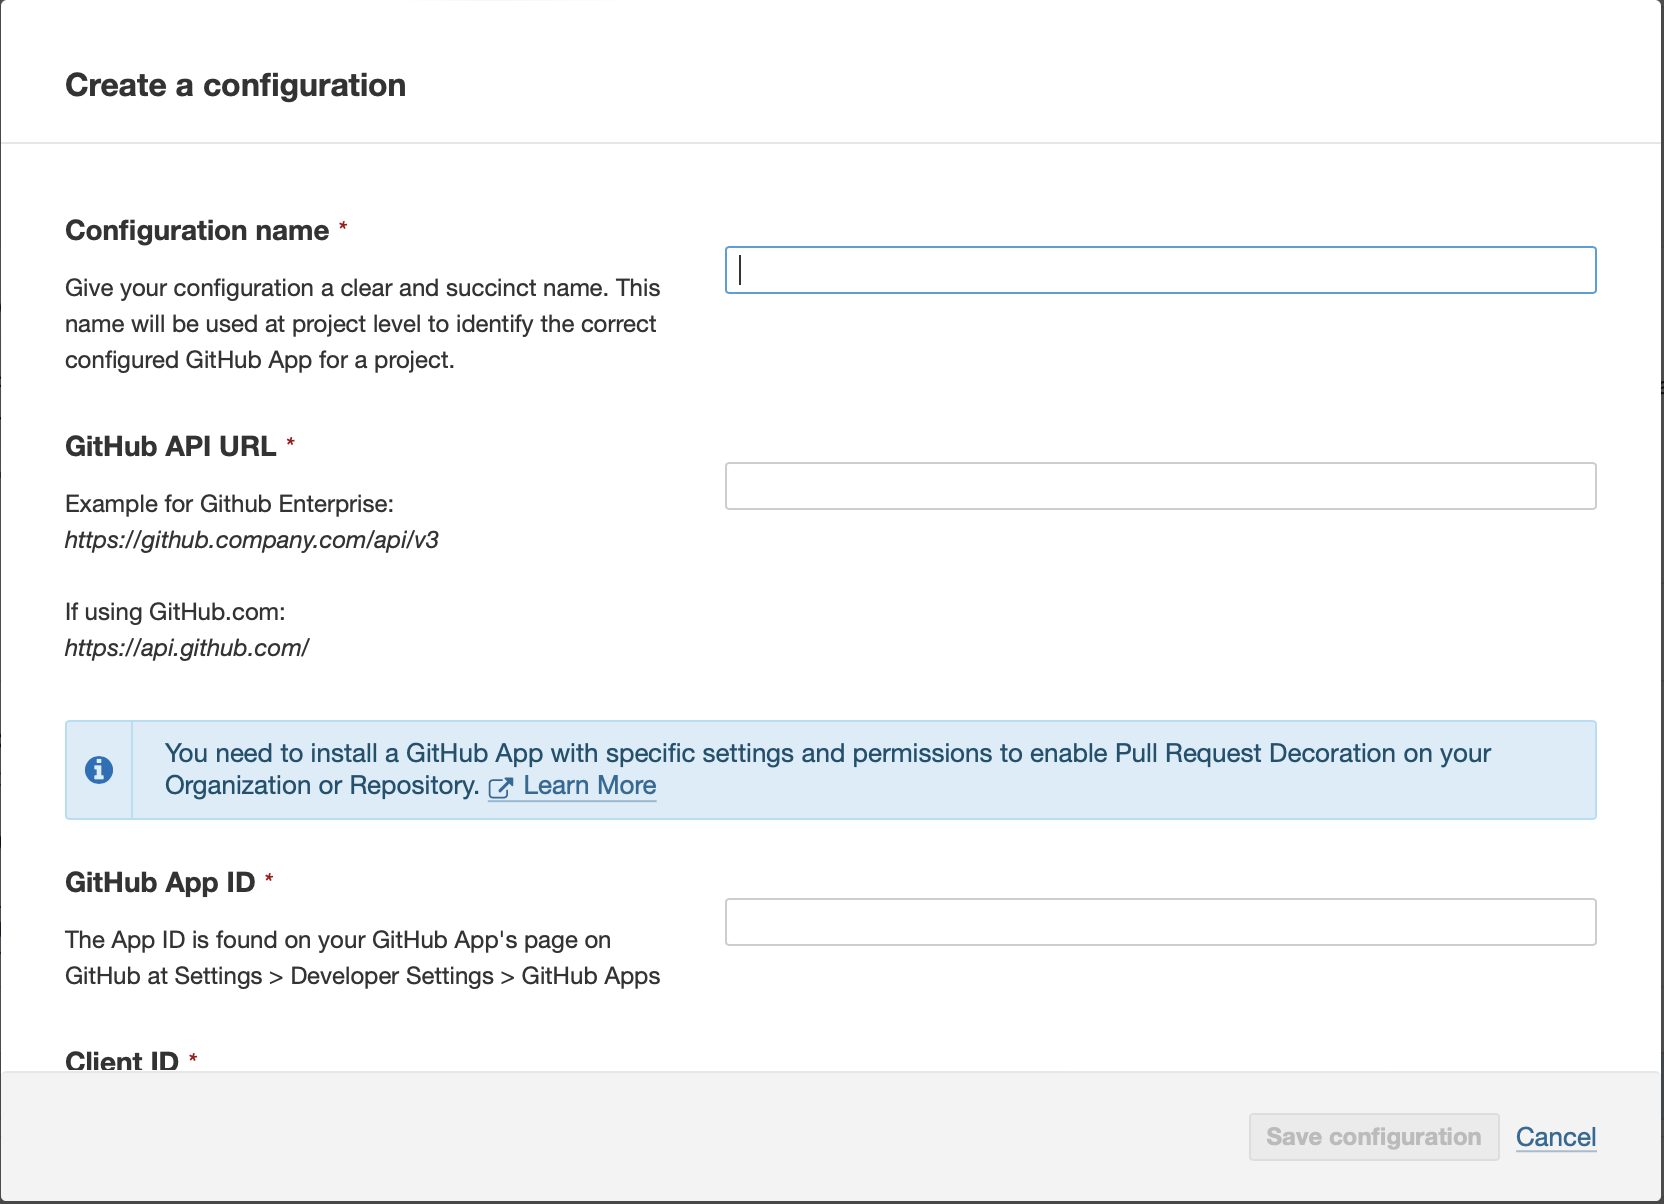
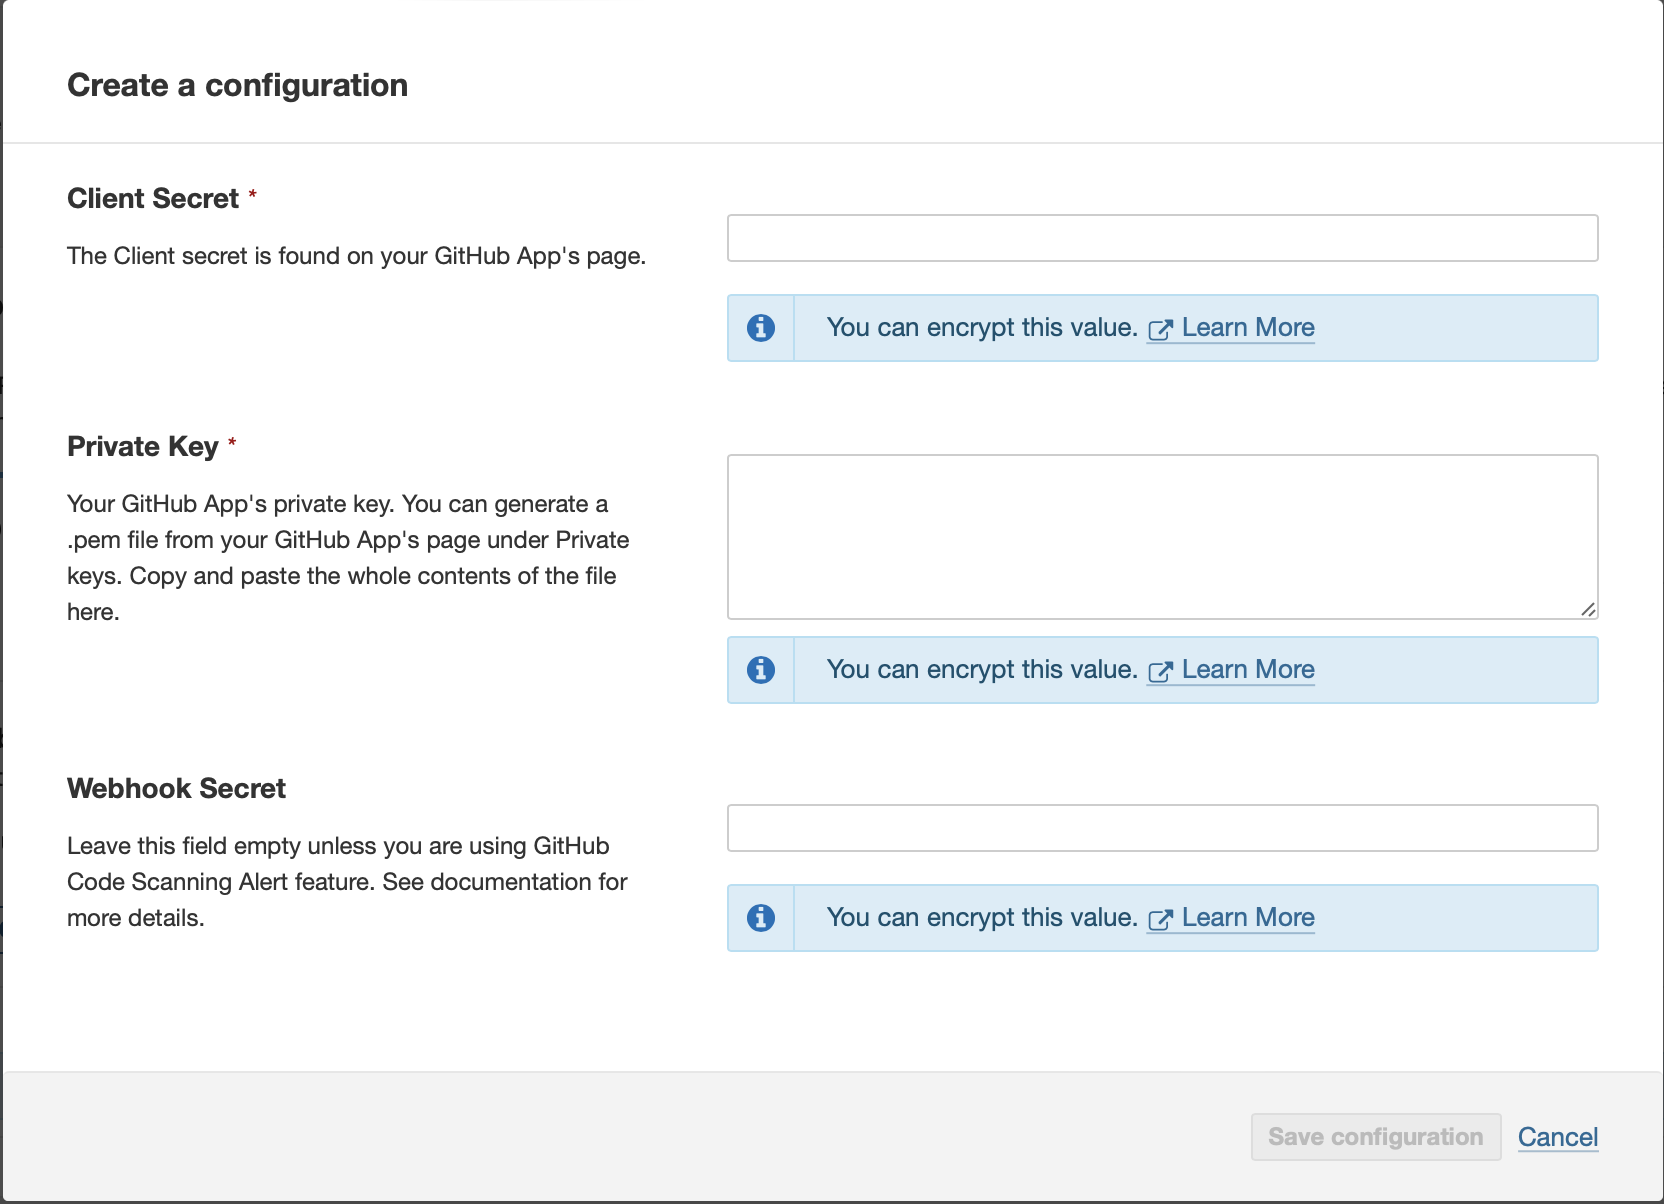
설정창에 알맞은 값을 모두 입력하고, save configuration을 누르면 아래 사진과 같이 완성이 됩니다!

이제, 다시 깃허브 레포지토리와 연동하는 페이지로 돌아와, 다음 과정을 거쳐 깃헙 레포와 연동해 줍시다.
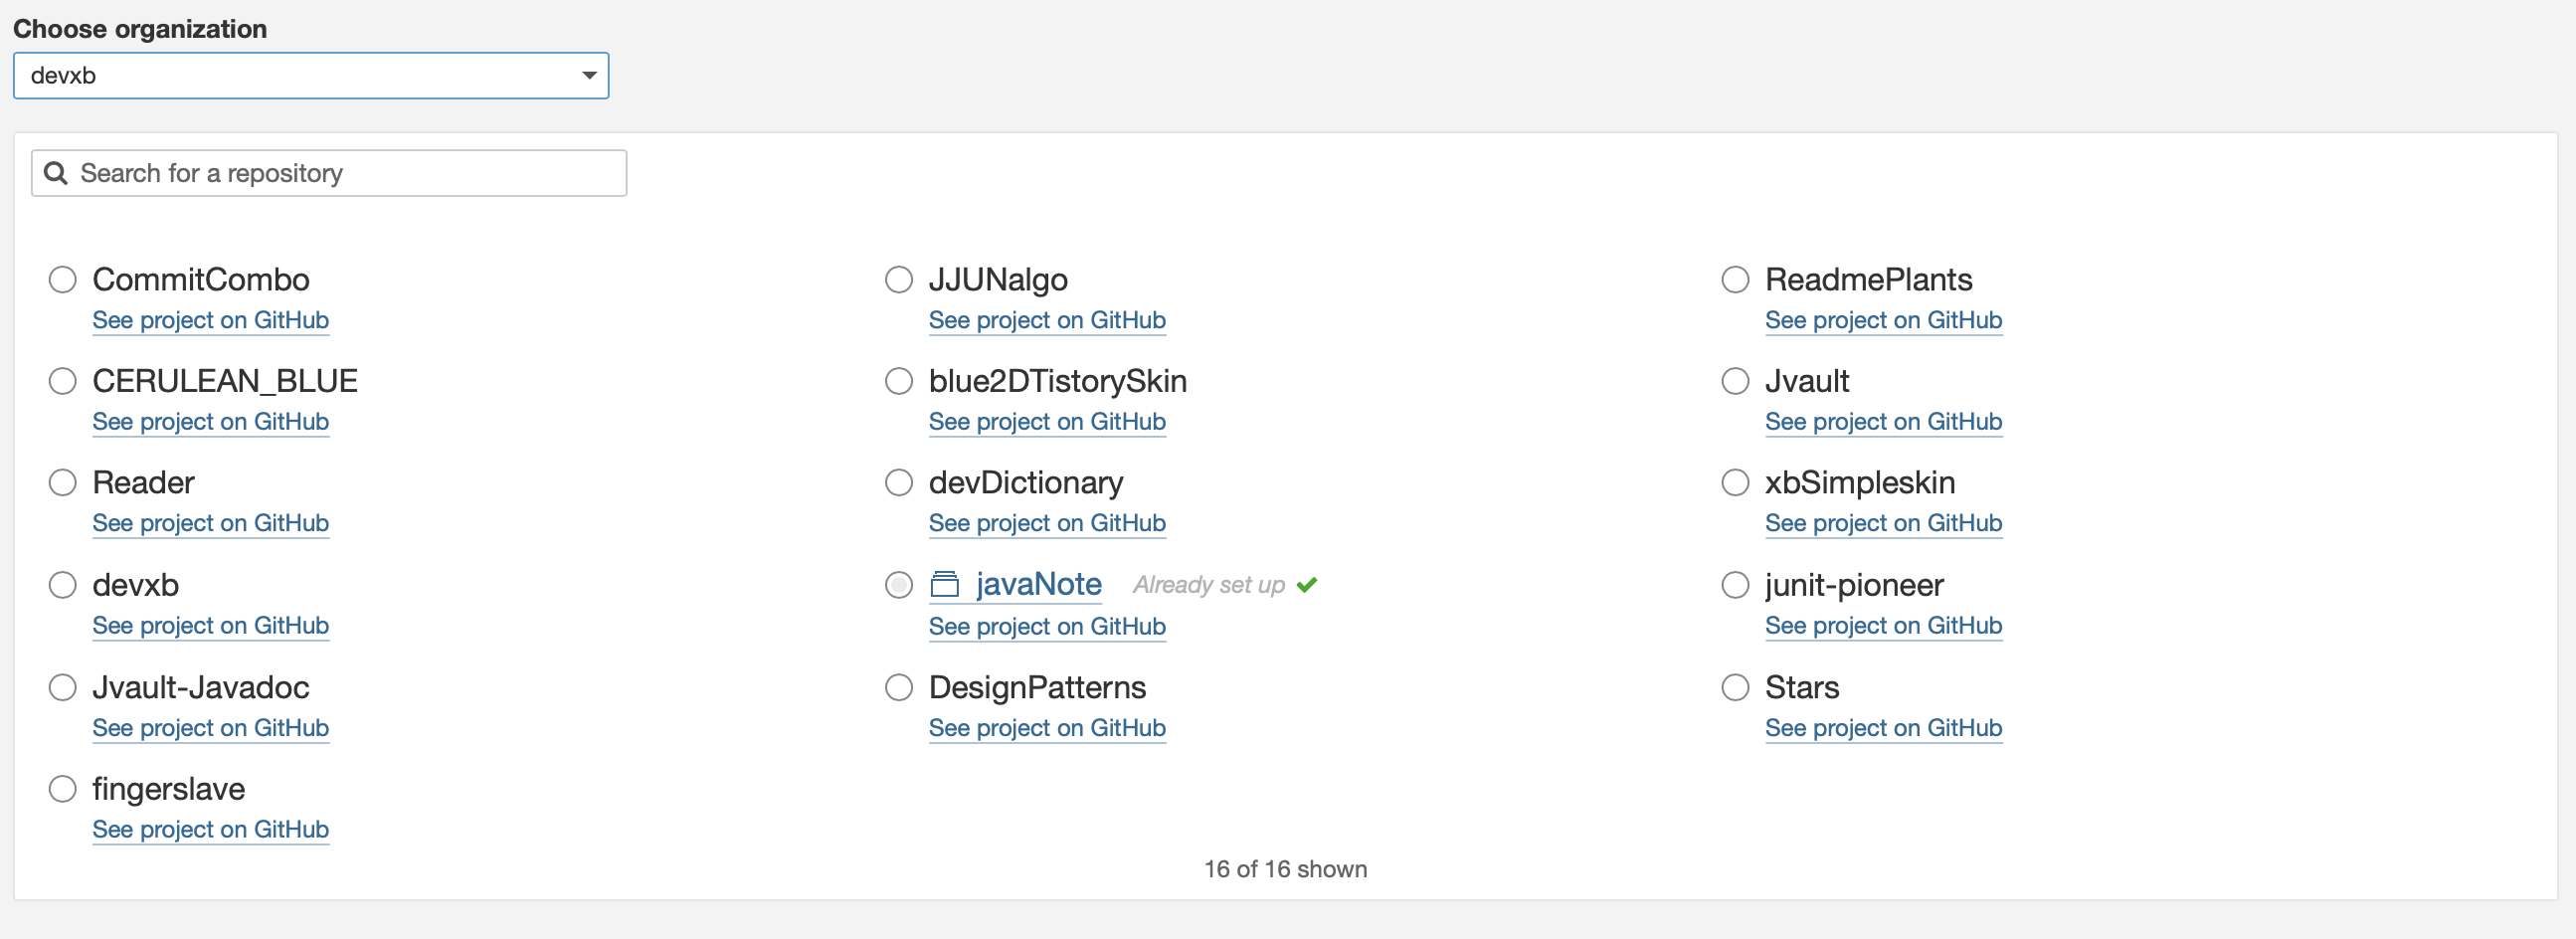
연결하려는 레포지토리를 클릭합시다.
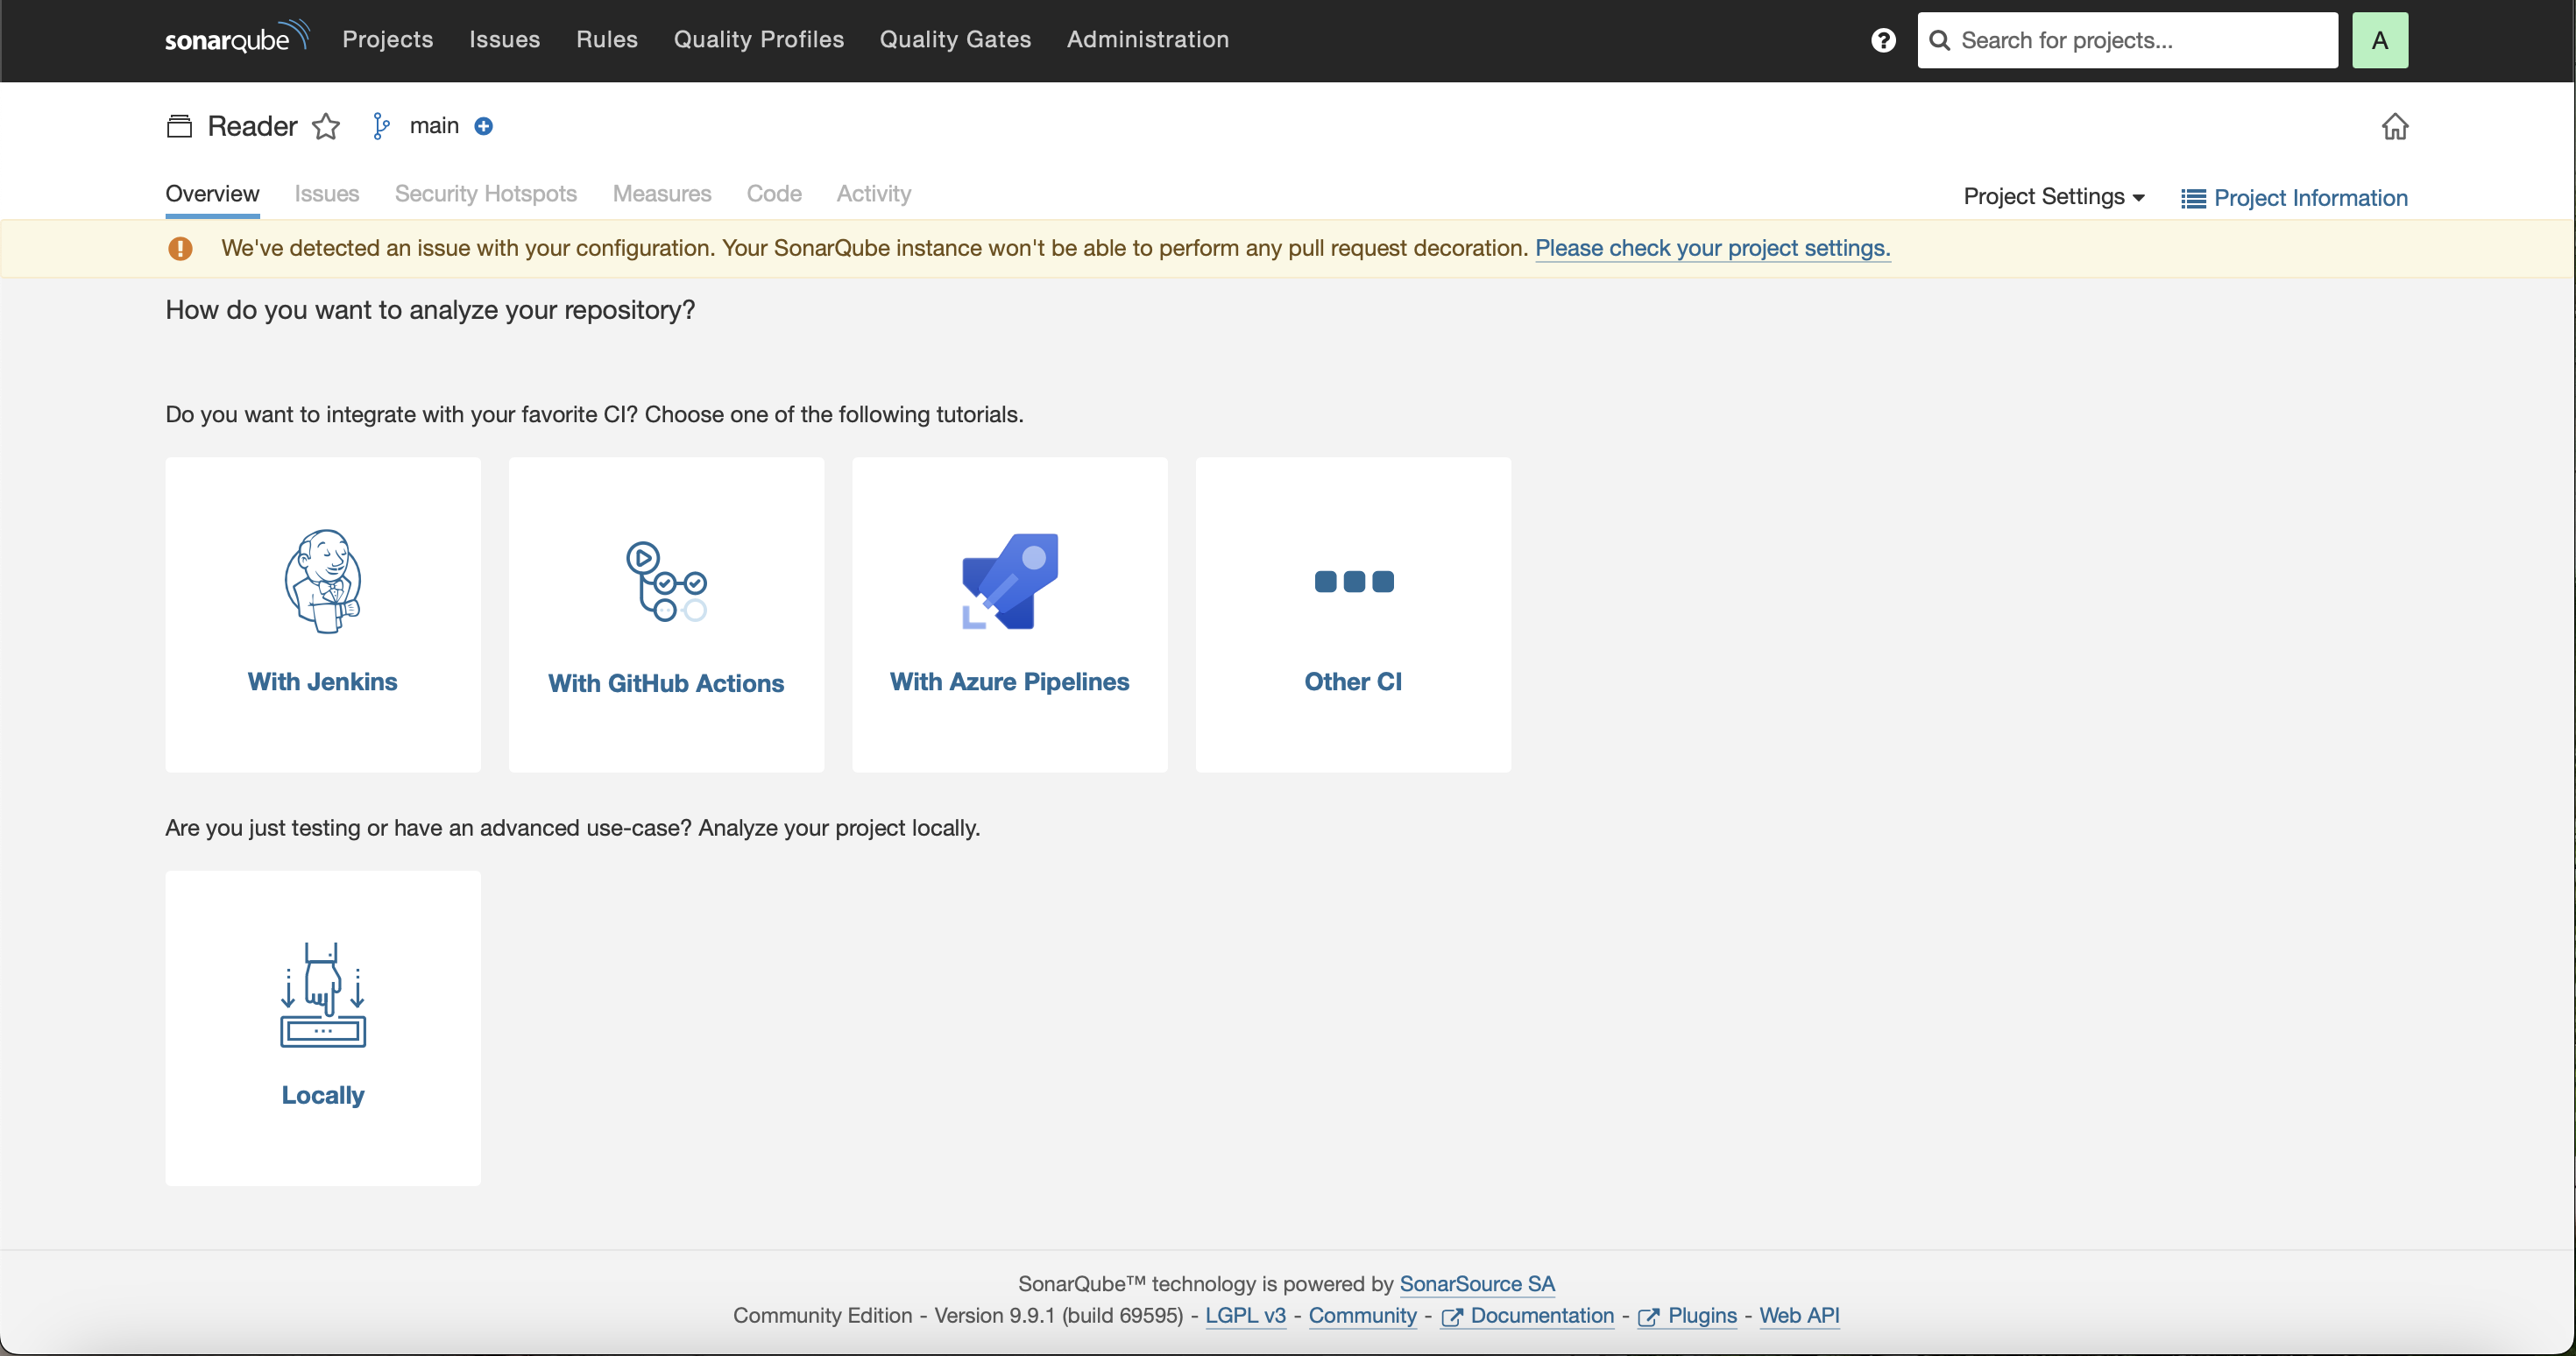
저는 github action과 연동할것이니.. github action을 클릭했습니다.
다른 CI와 연결하고 싶으면 원하는걸 누르시면 됩니다.
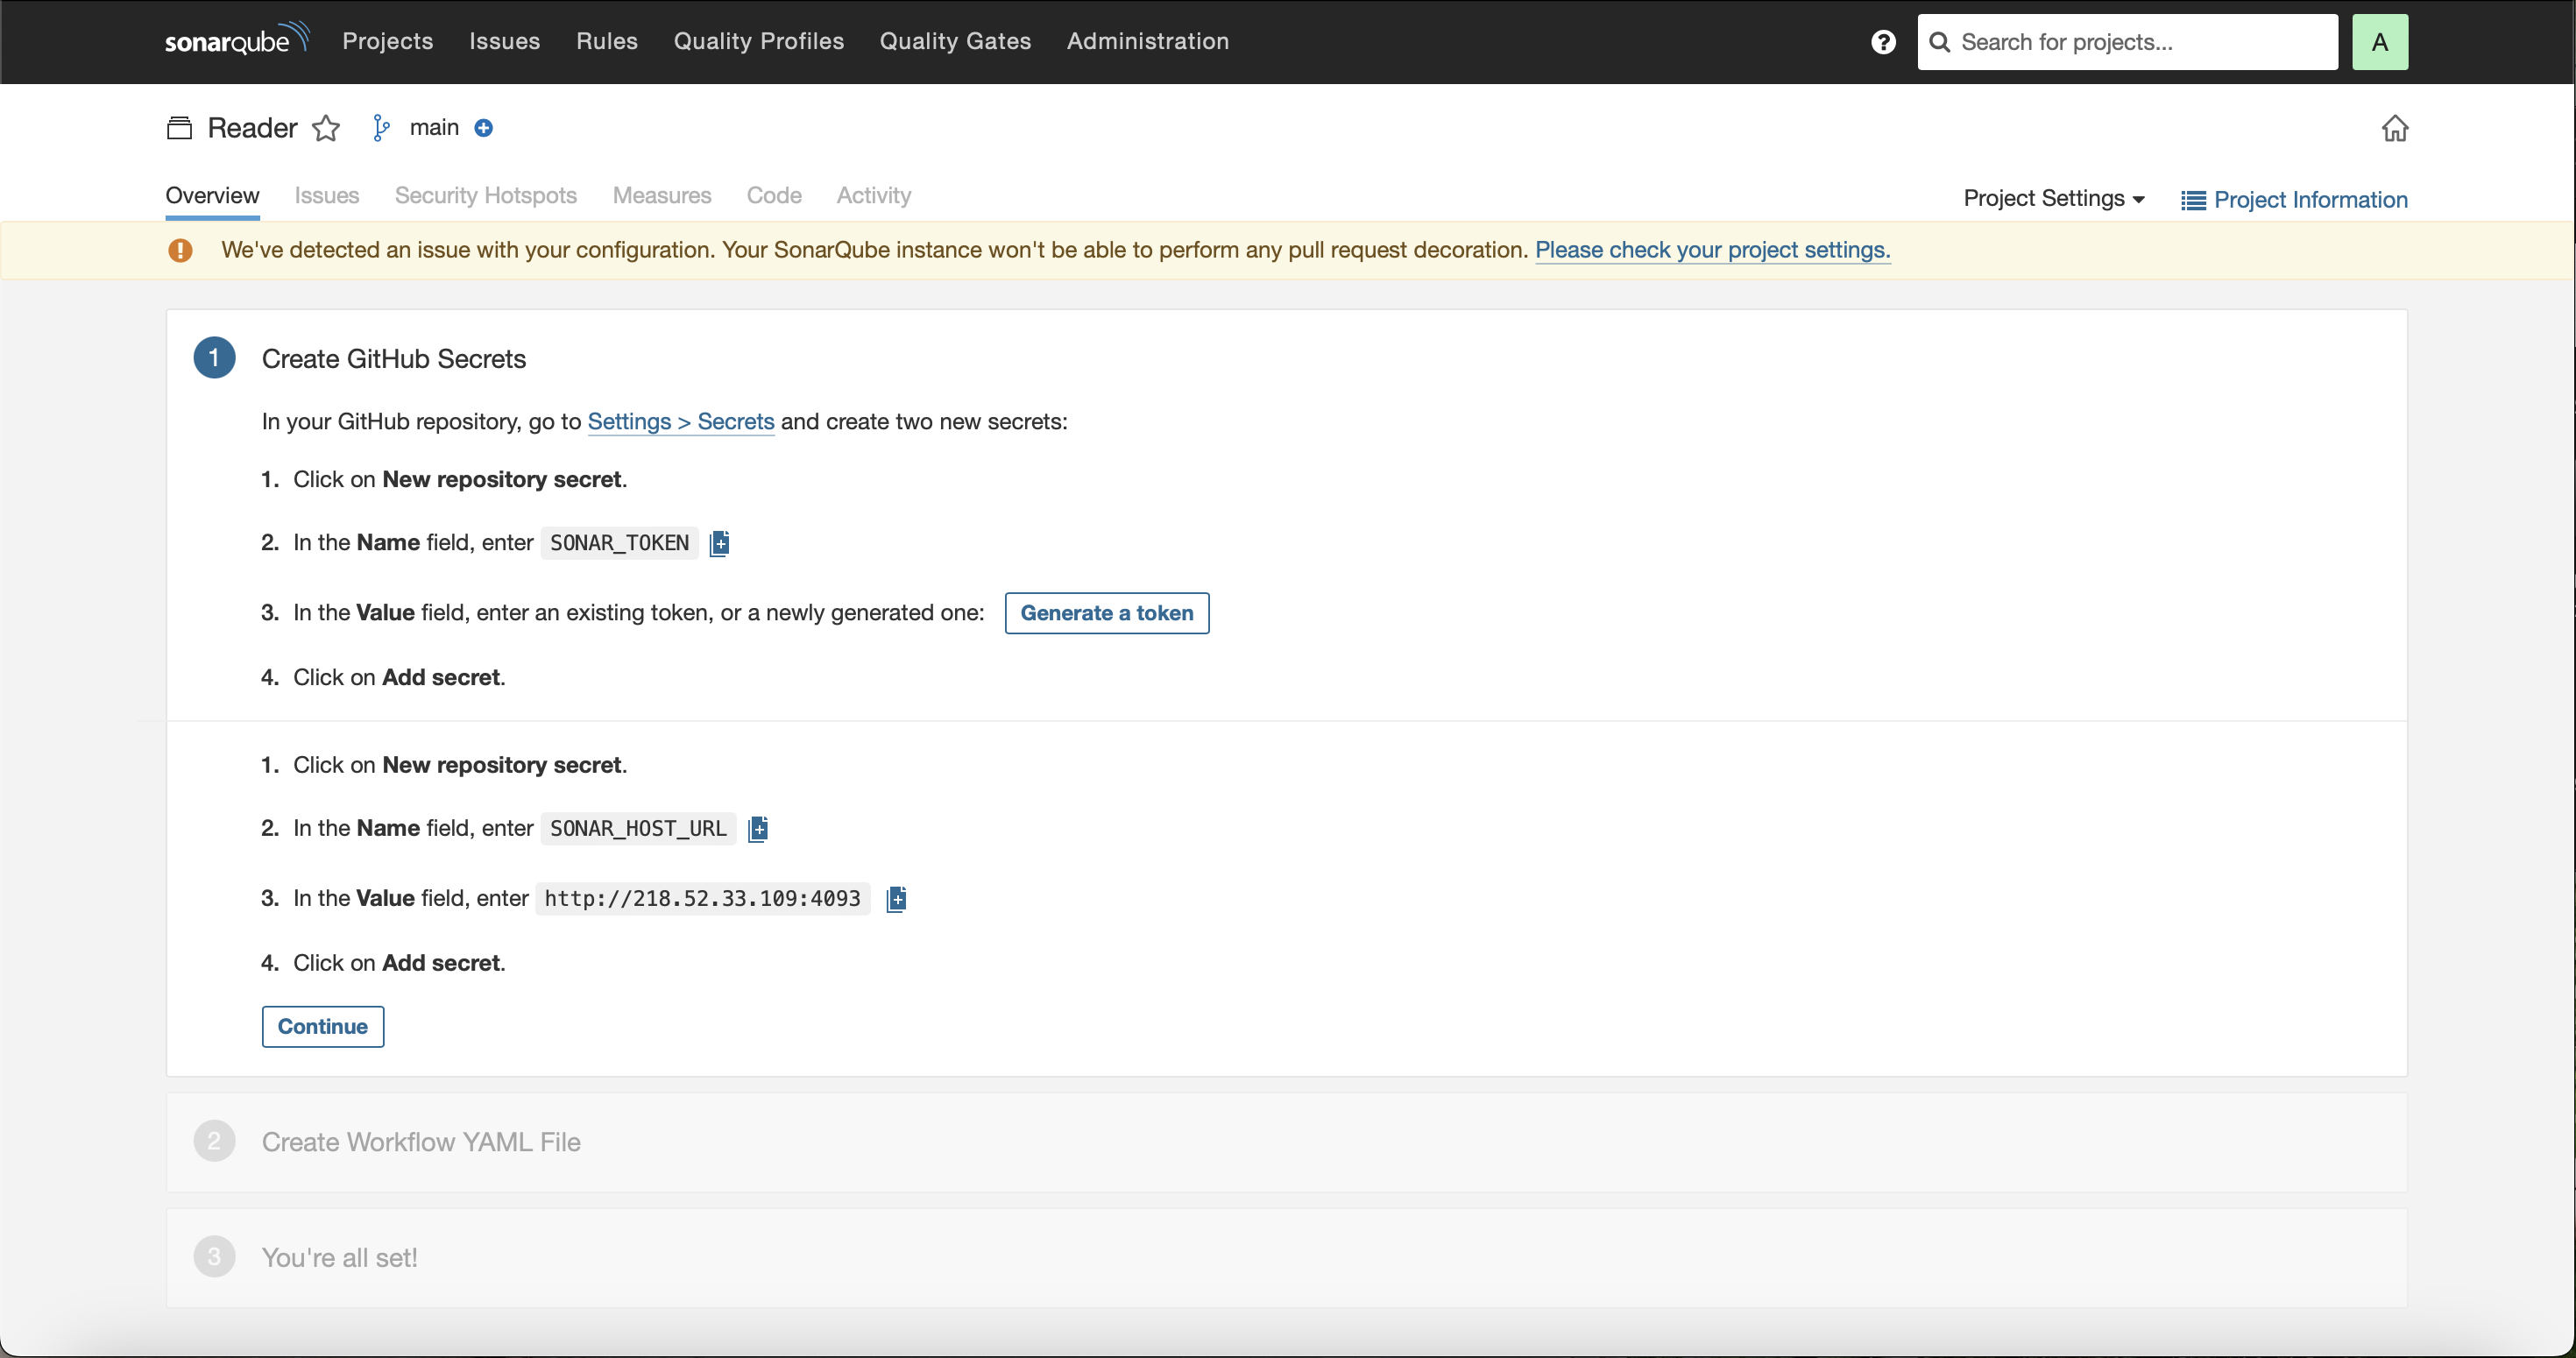
다음부터는 sonarqube 설명에 따라 진행하시면 돼요. (gradle설정 빼먹지 말고 꼭 합시다.)
설명이 잘 되어있어서, 똑같이 진행하면 연동이 됩니다.
주의할점이.. sonarqube에서 제공하는 github action workflows 파일 그대로 진행하면 연동은 되는데, quality gate가 실패해도 CI는 통과해요..! 그래서 저는 아래 .yml을 사용하고 있습니다.
on:
  pull_request:
    branches:
      - main

name: Sonar quality gate check
jobs:
  build:
    name: Build
    runs-on: ubuntu-latest
    steps:
      - uses: actions/checkout@v3
        with:
          fetch-depth: 0  # Shallow clones should be disabled for a better relevancy of analysis
      - name: Set up JDK 11
        uses: actions/setup-java@v3
        with:
          distribution: 'zulu'
          java-version: 11
      - name: Cache SonarQube packages
        uses: actions/cache@v3
        with:
          path: ~/.sonar/cache
          key: ${{ runner.os }}-sonar
          restore-keys: ${{ runner.os }}-sonar
      - name: Cache Gradle packages
        uses: actions/cache@v3
        with:
          path: ~/.gradle/caches
          key: ${{ runner.os }}-gradle-${{ hashFiles('**/*.gradle') }}
          restore-keys: ${{ runner.os }}-gradle
      - name: Build and analyze
        env:
          GITHUB_TOKEN: ${{ secrets.GITHUB_TOKEN }}  # Needed to get PR information, if any
          SONAR_TOKEN: ${{ secrets.SONAR_TOKEN }}
          SONAR_HOST_URL: ${{ secrets.SONAR_HOST_URL }}
        run: cd ./clean-architecture/hexagonal && ./gradlew build sonar --info -Dsonar.pullrequest.key=${{ github.event.pull_request.number }} -Dsonar.pullrequest.branch=${{ github.event.pull_request.head.ref }} -Dsonar.pullrequest.base=main

      # Check the Quality Gate status.
      - name: SonarQube Quality Gate check
        id: sonarqube-quality-gate-check
        uses: sonarsource/sonarqube-quality-gate-action@master
        with:
          scanMetadataReportFile: clean-architecture/hexagonal/build/sonar/report-task.txt
        # Force to fail step after specific time.
        timeout-minutes: 10
        env:
          SONAR_TOKEN: ${{ secrets.SONAR_TOKEN }}
          SONAR_HOST_URL: ${{ secrets.SONAR_HOST_URL }} #OPTIONAL

      # Optionally you can use the output from the Quality Gate in another step.
      # The possible outputs of the `quality-gate-status` variable are `PASSED`, `WARN` or `FAILED`.
      - name: "Example show SonarQube Quality Gate Status value"
        run: echo "The Quality Gate status is ${{ steps.sonarqube-quality-gate-check.outputs.quality-gate-status }}"
위 파일은 main에 pr시에만 동작하는데, push에서도 동작하게 하고싶다면, 가장위의 on...을 아래 사진과 같이 바꿔주면 돼요
on:
  push:
    branches:
      - main # the name of your main branch
Sonarqube Community branch plugin 연동
sonarqube-community-branch-plugin 공식 레포
https://github.com/mc1arke/sonarqube-community-branch-plugin
GitHub - mc1arke/sonarqube-community-branch-plugin: A plugin that allows branch analysis and pull request decoration in the Comm
A plugin that allows branch analysis and pull request decoration in the Community version of Sonarqube - GitHub - mc1arke/sonarqube-community-branch-plugin: A plugin that allows branch analysis and...
github.com
community-branch-plugin은 유료버전에서 사용할 수 있는 PR decoration을 무료에서도 사용하게 해주는 플러그인으로, sonarqube 플러그인 마켓에서 다운로드가 불가능 합니다. 다른 방법으로 설치해줘야 해요
저희는 docker로 설치했기 때문에, community-branch-plugin을 적용하기 위해서, docker container내부로 들어갈 겁니다.
실행중인 sonarqube container의 CONTAINER ID를 알아내기 위해서, 다음 명령어를 입력합시다
sudo docker container ls그리고, 아래 명령어를 입력해서, super user로 컨테이너에 붙어줄 겁니다. (${}는 빼주세요)
sudo docker exec -it --user root ${CONTAINER ID} /bin/bash그 후, ls -al 과 같은 명령어를 입력해서 파일 구조를 확인하면, 아래 사진과 같이 나올겁니다.
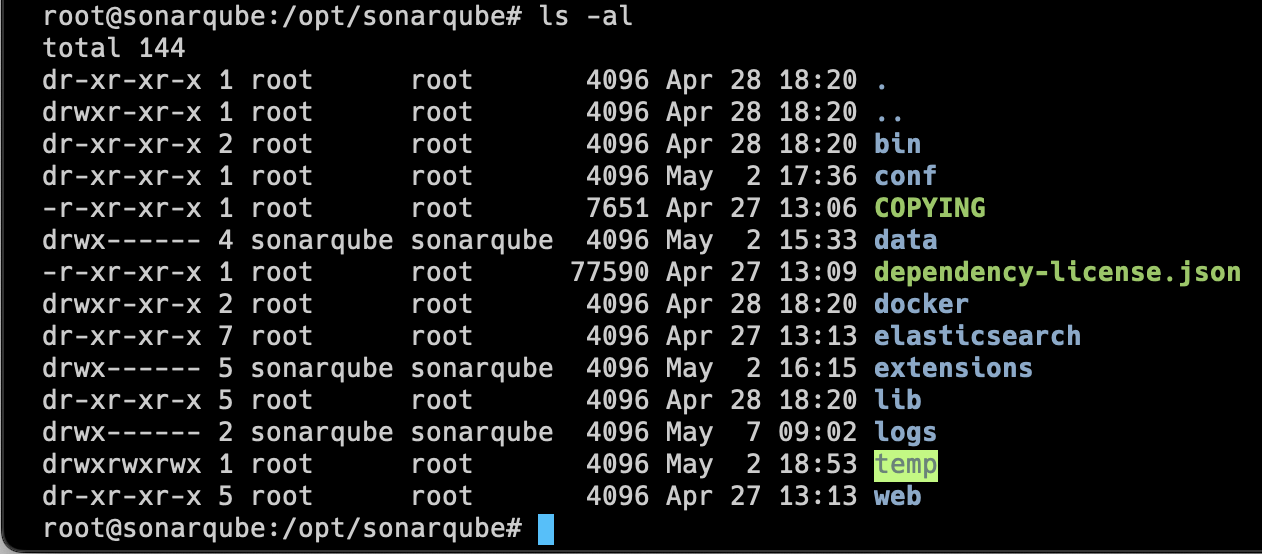
여기서 저희는 extensions/plugins/ 로 들어갑니다.
그 후, 아래 명령어를 입력해서, community-branch-plugin을 다운해줍시다.
wget https://github.com/mc1arke/sonarqube-community-branch-plugin/releases/download/1.14.0/sonarqube-community-branch-plugin-1.14.0.jar다운로드가 완료되었다면, /conf/sonar.properties 파일을 열고, 아래 설정을 추가해줍시다.
sonar.web.javaAdditionalOpts=-javaagent:./extensions/plugins/sonarqube-community-branch-plugin-1.14.0.jar=web

sonar.ce.javaAdditionalOpts=-javaagent:./extensions/plugins/sonarqube-community-branch-plugin-1.14.0.jar=ce
그 후, sonarqube를 재실행 하면 설정은 끝 입니다!
확인하기
이제, PR을 날려서, 잘 동작하는지 확인해봅시다.

'끄적끄적' 카테고리의 다른 글
| [끄적끄적] ProtocolBuffer로 API 문서 작성기 (0) | 2024.01.13 |
|---|---|
| [끄적끄적] E2E(API) 테스트 자동화 도입기 (0) | 2023.10.18 |
| [끄적끄적] Rust로 PS 후기 (0) | 2023.04.17 |
| [끄적끄적] SpringBoot에서 가장쉽게 Xss filtering을 하는 방법 (0) | 2023.03.11 |
| [Tistory Skin] CERULEAN_BLUE 무료 배포 (2) | 2022.12.20 |

