[끄적끄적] HATEOAS AOP적용기
토이플젝에 API유연성을 높이고자 HATEOAS를 적용하기로 했다.
Hateoas를 AOP로 만들어서 사용하기로한 이유는 크게 다음과 같다.
1. HATEOAS적용은 특정한 코드에 종속적일 필요가없다.
2. HATEOAS의 적용은 특정한 위치에 지속적으로 반복되어서 나타난다. (예를 들어, Hateoas적용은 컨트롤러에서 사용자에게 응답하는 과정에서 반복적으로 일어난다.)
+ 이 당시 Spring Boot에 HATEOAS관련 라이브러리가 존재하는것을 몰라서 직접 구현했는데, 구현목적으로 이 글을 읽는 분이라면 Hateoas구현부분은 라이브러리로 대체하고, AOP를 적용하는부분만 읽는것을 추천한다. 실력있는 개발자가 지속적으로 버전관리를 해주기 때문에, 라이브러리를 선택하지 않을 이유가 없다.
실제적용 결과
(내가 만들어놓은 AOP구현체가 여러가지 붙어있는데, 자세한 내용은 주석을 참고하자)
	@ExpectedTime(milliSec=100) // 수행시간이 기대시간을 초과할시 WARN로그가 찍히게 만들어놓음
	@HateoasSetter(hateoasType=HateoasType.USERINFOHATEOAS) // <-- 이 줄이 이 글에서 설명할 Hateoas적용 AOP다.
	@AuthToken(tokenType=TokenType.JWT) // 이 URL로 접근하는 유저의 토큰을 인증한다.
	@RequestMapping(path="/{name}", method=RequestMethod.GET)
	public ResponseEntity<UserDTO> getUser(@PathVariable("name") String name){

		UserDTO userDTO = this.userInfoCrudProxy.read(name);

		return new ResponseEntity(userDTO, HttpStatus.OK);
	}
결과
{
  "id" : 1,
  "name" : "devxb",
  "profileUrl" : "https://avatars.githubusercontent.com/u/62425964?v=4",
  "links" : [ {
    "rel" : "getThis",
    "method" : "GET",
    "href" : "https://api.gitofolio.com/user/{name}"
  }, {
    "rel" : "deleteThis",
    "method" : "DELETE",
    "href" : "https://api.gitofolio.com/user/{name}"
  }, {
    "rel" : "getStat",
    "method" : "GET",
    "href" : "https://api.gitofolio.com/user/stat/{name}"
  }, {
    "rel" : "getDailyStat",
    "method" : "GET",
    "href" : "https://api.gitofolio.com/user/dailystat/{name}"
  }, {
    "rel" : "getLoginedUser",
    "method" : "GET",
    "href" : "https://api.gitofolio.com/user"
  } ]
}
HateoasSetter 어노테이션에 의해 클라이언트에게 links[]필드가 생성되어 전달된다.
구현목표
1. HATEOAS는 여러 리소스에 중복적으로 적용될수 있어야한다.
-> HATEOAS 객체는 리소스가 HATEOAS를 적용할수있는 리소스인지 알 수 없다. 따라서, 리소스에 HateoasAble 인터페이스를 구현하게해서 실제 적용을 인가할것이다.
2. HATEOAS에 링크 추가, 삭제, 변경은 자유로워야 하며 독립적이어야한다.
-> 템플릿 메소드 패턴을 사용해 알고리즘을 재사용 할것이다.. 상위 추상클래스에 알고리즘을 정의하고, 하위 구현클래스에서는 자신의 링크만 추가하도록 한다.
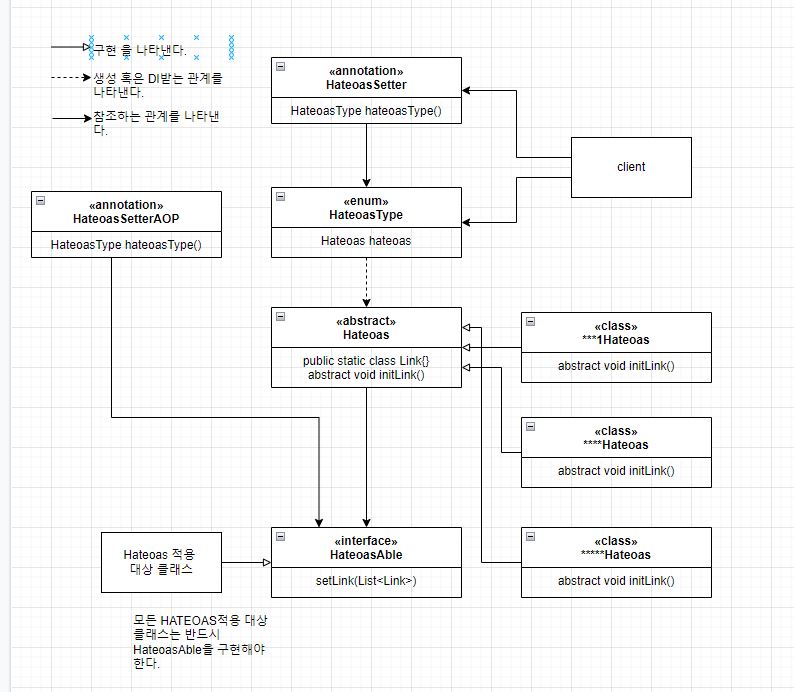
최종적으로 완성될 코드 UML은 아래와 같다.
구현 - Hateoas 구현 객체
AOP관련 객체를 만들기전 우선, HATEOAS 구현 객체를 만들자.
Hateoas구현 책임을 갖고있는 객체
@Component
public abstract class Hateoas{

	public static class Link{
		private String rel;
		private String method;
		private String href;
		private String parameter;

		public Link(String rel, String method, String href){
			this.rel = rel;
			this.method = method;
			this.href = href;
		}

		public Link(String rel, String method, String href, String parameter){
			this.rel = rel;
			this.method = method;
			this.href = href;
			this.parameter = parameter;
		}

		public String getRel(){
			return this.rel;
		}

		public String getMethod(){
			return this.method;
		}

		public String getHref(){
			return this.href;
		}

		public String getParameter(){
			return this.parameter;
		}

	}

	protected List<Link> links;

	public void setHateoas(HateoasAble target){
		target.setLinks(this.links);
	}

	public abstract void initLinks();

	public Hateoas getHateoas(){
		return this;
	}

	public List<Link> getLinks(){
		return this.links;
	}

}

@Component
public class UserInfoHateoas extends Hateoas{

	public UserInfoHateoas(){
		this.initLinks();
	}

	@Override
	public void initLinks(){
		this.links = new ArrayList<Link>();
		this.links.add(new Link("getThis", "GET", "링크"));
		this.links.add(new Link("deleteThis", "DELETE", "링크"));
		this.links.add(new Link("postThis", "POST", "링크"));
		this.links.add(new Link("getStat", "GET", "링크"));
		this.links.add(new Link("getDailyStat", "GET", "링크"));
	}

}
1. 클라이언트에게 실제로 보여질 뼈대 역할을 하는 객체를 만든다.
public static class Link{
		private String rel;
		private String method;
		private String href;
		private String parameter;

		public Link(String rel, String method, String href){
			this.rel = rel;
			this.method = method;
			this.href = href;
		}

		public Link(String rel, String method, String href, String parameter){
			this.rel = rel;
			this.method = method;
			this.href = href;
			this.parameter = parameter;
		}

		public String getRel(){
			return this.rel;
		}

		public String getMethod(){
			return this.method;
		}

		public String getHref(){
			return this.href;
		}

		public String getParameter(){
			return this.parameter;
		}

	}
위 링크 객체를 다른 객체에 삽입해서 사용자에게 HATEOAS링크를 보여준다. 추상클래스 구현 클래스에서 Link객체를 사용해서 links필드를 채워넣는다.
2. 객체에 Hateoas적용 행위를 전가하는 메소드
	public void setHateoas(HateoasAble target){
		target.setLinks(this.links);
	}
코드를 보면 매개변수로 HateoasAble인터페이스를 받는걸 볼 수 있다. Hateoas 적용은 API어디에서나 일어날 수 있는 만큼, 적용 대상 또한 다양해 질 수 밖에 없는데, 이런 상황에서 구체 클래스를 매개변수로 받는 것은 확장과 변화에 취약하다. 따라서, Hateoas를 적용할 수 있는 클래스를 HateoasAble을 구현한 클래스로 한정하고, 실제 적용은 HateoasAble 을 구현한 객체에 전가한다.
즉, HateoasAble을 구현한 클래스는 모두 자신에게 Hateoas를 적용하는 행위를 할 책임이 있다.
3. HateoasAble 인터페이스
public interface HateoasAble{

	public void setLinks(List<Link> links);

}
HateoasAble의 setLinks()메소드를 구현한 객체는 Hateoas적용 책임을 갖는다.
4. 실제 links필드를 채워넣는 Hateoas 구현 클래스
@Component
public class UserInfoHateoas extends Hateoas{

	public UserInfoHateoas(){
		this.initLinks();
	}

	@Override
	public void initLinks(){
		this.links = new ArrayList<Link>();
		this.links.add(new Link("getThis", "GET", "링크"));
		this.links.add(new Link("deleteThis", "DELETE", "링크"));
		this.links.add(new Link("postThis", "POST", "링크"));
		this.links.add(new Link("getStat", "GET", "링크"));
		this.links.add(new Link("getDailyStat", "GET", "링크"));
	}

}
구현 객체는 Override한 setHateoas()메소드에 links필드를 채워넣을 알고리즘을 정의하고 생성과정에서 부모클래스의 links필드를 채워 넣는다.
api에 적용될 Hateoas종류에 따라 구현 객체를 만들어 links필드를 정의하면된다.
5. Hateoas적용대상 객체는 HateoasAble을 구현한다.
@Component
public class EndPointHateoasDTO implements HateoasAble{
	/***/

	public List<Link> getLinks(){
		return this.links;
	}

	@Override
	public void setLinks(List<Link> links){
		this.links = links;
	}
	/***/
}

public class UserDTO implements HateoasAble{
	/***/

	@Override
	public void setLinks(List<Link> links){
		this.links = links;
	}

	public List<Link> getLinks(){
		return this.links;
	}

	/***/
}
구현 - AOP
이 글의 주제인 Hateoas를 AOP로 적용하는 부분이다.
API는 시간이 지남에따라 증가할수도 감소할수도 있다. 따라서, 자바의 어노테이션을 이용하여 AOP를 적용해 Hateoas적용에 유연성을 줄것이다.
1. 우선 AOP의 Joinpoint가 될 어노테이션을 만들자.
@Target(ElementType.METHOD)
@Retention(RetentionPolicy.RUNTIME)
public @interface HateoasSetter{

	HateoasType hateoasType();

}
어노테이션의 HateoasType이넘값을 리플랙트를 이용해 읽어올 것 이기 때문에, Retention정책을 RUNTIME으로 설정하고, URL별로 적용하기위해, 적용타겟을 METHOD로 설정한다.
HateoasType은 자바의 enum으로 구현했다. enum을 사용함으로써 타입 안정성을 얻을수있고, enum클래스에서 미리 만들어놓은 Hateoas구현클래스를 제공하는 방식으로 낮은 결합도를 얻을 수 있다. (클라이언트는 어떤 구현체가 사용될지 알지 못하기 때문임)
2. HateoasType enum 클래스
public enum HateoasType {

	USERINFOHATEOAS,
	***HATEOAS,
	****HATEOAS,
	*****HATEOAS,
	ENDPOINTHATEOAS;

	private Hateoas hateoas = null;

	public Hateoas getHateoasInstance(){
		return this.hateoas;
	}

	@Component
	private static class HateoasTypeConsistutor{

		@Autowired
		public HateoasTypeConsistutor(@Qualifier("****Hateoas") Hateoas userInfoHateoas,
									 @Qualifier("***Hateoas") Hateoas ***Hateoas,
									 @Qualifier("****Hateoas") Hateoas ****Hateoas,
									 @Qualifier("*****Hateoas") Hateoas *****Hateoas,
									 @Qualifier("endPointHateoas") Hateoas endPointHateoas){
			USERINFOHATEOAS.hateoas = userInfoHateoas;
			***HATEOAS.hateoas = ***Hateoas;
			****HATEOAS.hateoas = ****Hateoas;
			*****HATEOAS.hateoas = *****Hateoas;
			ENDPOINTHATEOAS.hateoas = endPointHateoas;
		}

	}

}
enum값을 이전에 만든 Hateoas 구현체 만큼 만들고, 각각 매핑한다.
3. AOP구현체
@Aspect
@Component
public class HateoasSetterAop{

	private final AnnotationExtractor<HateoasSetter> annotationExtractor;

	@AfterReturning(value="@annotation(com.gitofolio.api.aop.hateoas.annotation.HateoasSetter)", returning="aopTarget")
	public Object setHateoas(JoinPoint joinPoint, Object aopTarget) throws Throwable{
		// HateoasAble을 구현하지않았다면 예외를 던진다.
		if(!isHateoasAble(aopTarget)) throw new ClassCastException(aopTarget.getClass().toString()+" HATEOAS를 적용할수 없는 리턴타입임.");

		// HateoasSetter를 추출한다. annotationExtractor클래스는 아래 코드 블록을 보자
		HateoasSetter hateoasSetter = this.annotationExtractor.extractAnnotation(joinPoint, HateoasSetter.class);
		Hateoas hateoas = hateoasSetter.hateoasType().getHateoasInstance();

		// 이미 윗 줄에서 타입 안정성검증은 끝났다. 여기서는 적용만 해주면 된다.
		if(isResponseEntity(aopTarget)){ // Hateoas를 적용할 타입이 ResponseEntity라면,
			hateoas.setHateoas((HateoasAble)((ResponseEntity)aopTarget).getBody());
		}
		else hateoas.setHateoas((HateoasAble)aopTarget);
		return aopTarget;
	}

	private boolean isHateoasAble(Object aopTarget){
		try{
			if(isResponseEntity(aopTarget)){
				HateoasAble hateoasAble = (HateoasAble)(((ResponseEntity)aopTarget).getBody());
			}
			else {
				HateoasAble hateoasAble = (HateoasAble)aopTarget;
			}
		}catch(ClassCastException CCE){
			return false;
		}
		return true;
	}

	private boolean isResponseEntity(Object aopTarget){
		if(aopTarget.getClass().equals(ResponseEntity.class)) return true;
		return false;
	}

	@Autowired
	public HateoasSetterAop(@Qualifier("annotationExtractor") AnnotationExtractor<HateoasSetter> annotationExtractor){
		this.annotationExtractor = annotationExtractor;
	}

}
자세한 내용은 주석을 참조하시라
컨트롤러에 매핑된 어노테이션을 통해 호출되며, 리플렉트로 어노테이션을 찾아서 파라미터값을 얻고, 이 를 통해, Hateoas를 적용시킨다.
4. 어노테이션을 추출하는 AnnotationExtractor 코드
@Component
public class AnnotationExtractor<T extends Annotation>{

	public T extractAnnotation(JoinPoint joinPoint, Class<T> annotationType){
		String methodName = joinPoint.getSignature().getName();
		Class targetClass = joinPoint.getTarget().getClass();

		T ans = null;
		Method[] methods = targetClass.getMethods();
		for(Method method : methods){
			if(method.getName().equals(methodName)){
				ans = method.getAnnotation(annotationType);
				break;
			}
		}
		return ans;
	}

}
함수의 두번째 인자인 annotationType에 리턴받을 annotationType을 지정한다. (T값과 동일해야한다.)
혹시나 위 구현코드를 참조할 거라면,
T ans = null;위 라인을 주의깊게 보자.
나는 annotationExtractor클래스를 호출하는 상황이 NullPointerException에 안전함이 보장되어서 별도로 처리하지않았는데, 자신의 구현이 안전하다는 보장이 없다면 예외처리를 해주길 바란다.
(annotationExtractor클래스가 호출되려면 AOP구현체가 호출되어야하고, AOP구현체가 호출되려면 어노테이션이 매핑되어있어야한다. 따라서, T값은 절대로 null일 수 없다.)
프로젝트 소스코드
https://github.com/gitofolio/gitofolio
GitHub - gitofolio/gitofolio: 💎 Github, Notion, Blog... 를 자신의 이력 카드로 꾸미세요
💎 Github, Notion, Blog... 를 자신의 이력 카드로 꾸미세요. Contribute to gitofolio/gitofolio development by creating an account on GitHub.
github.com
'끄적끄적' 카테고리의 다른 글
| [끄적끄적] OAuth proxy 서버 인증 flow 설계과정 (0) | 2022.04.10 |
|---|---|
| [Spring Boot] 404에러 핸들링과 .jsp .html 동시 사용 (0) | 2022.02.19 |
| [끄적끄적] JpaRepository 접근 프록시 계층 설계 (0) | 2022.01.04 |
| [끄적끄적] SVG를 img태그로 불러올 경우 발생하는 문제와 해결 (0) | 2021.12.29 |
| [Spring Boot] Interceptor - postHandle() (0) | 2021.11.13 |


